


Clara Mae likes to pull all her wipes out of the wipe container which got this mama thinking: Hey! I should make her a box she can pull fabric out of! Well, that turned into pulling scarves, then toys, then I kind of forgot all about it.
A couple weeks later we were at Lakeshore Learning Center looking for gift ideas for Miss Maze's first birthday and what should I see but my invention! Ok, so I concede to the fact that I'm not the first to come up with this idea (clearly, since they are being sold at a large store) but seeing it restored my drive to make one for Maze. The price tag helped me with the handmade decision a bit too.
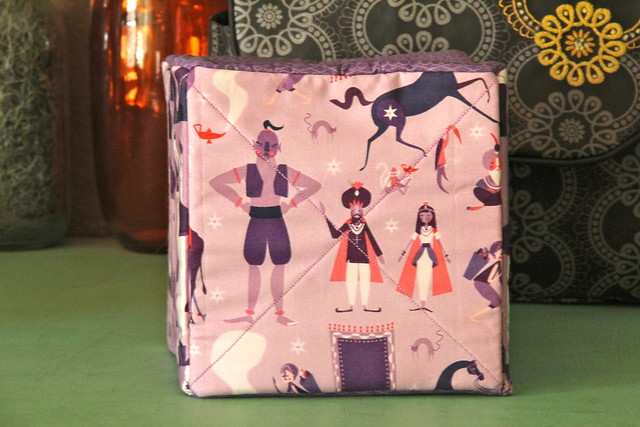
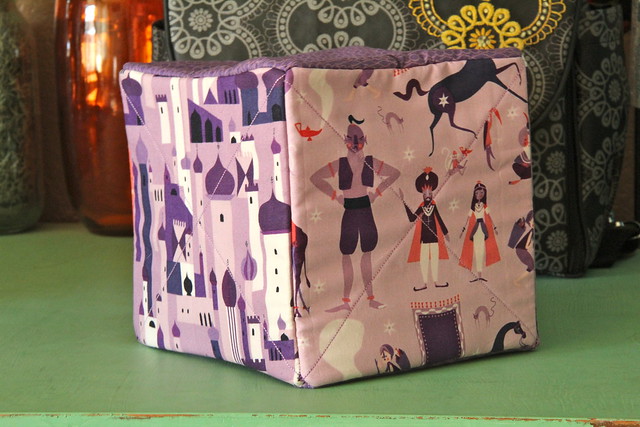
So here you go: The Discovery Box.

Supplies:
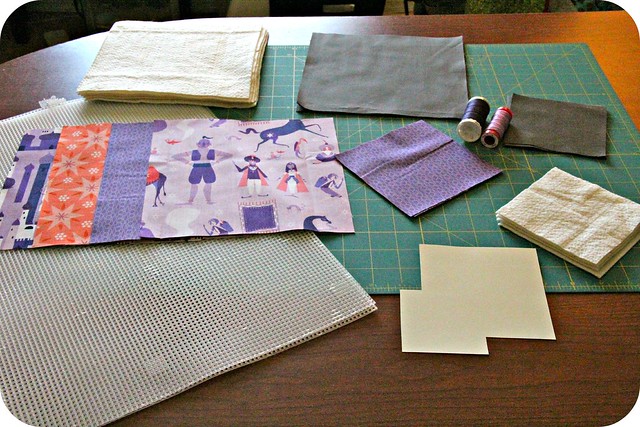
- Five 8"x8" squares patterned fabric for outside sides and bottom
- Five 8"x8" squares fabric for inside sides and bottom
- Four 5"x5" squares patterned fabric for the outside top
- Four 4"x4" squares fabric for the inside top
- Five 8"x8" squares batting for sides and bottom
- Four 4 1/4" x 4 1/4" squares of batting for the top
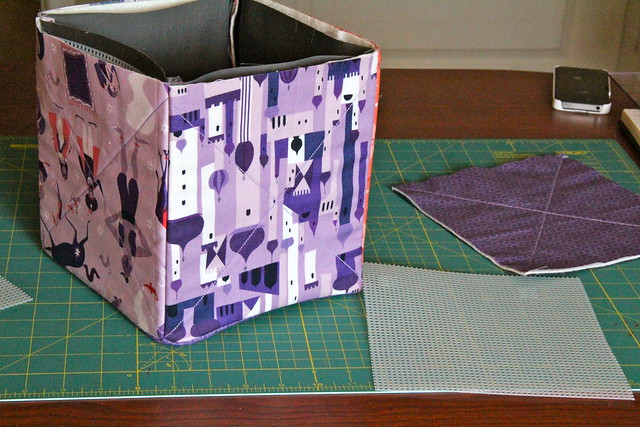
- Five 7"x7" squares plastic lacing sheet
- Piecing and quilting thread
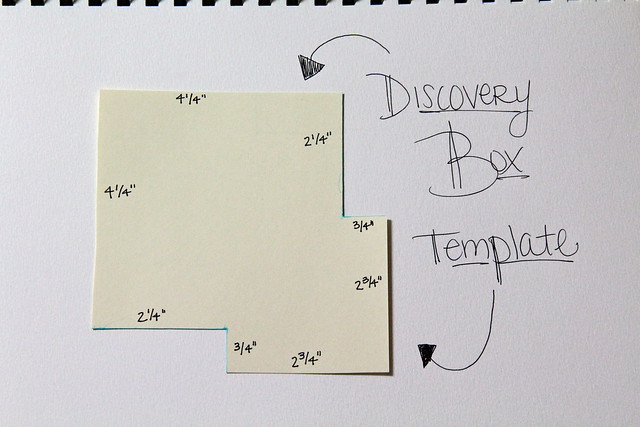
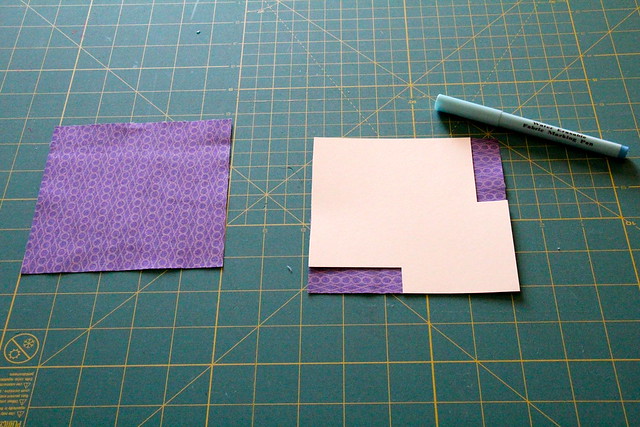
You will also need a template for creating the top quarters. Mine started as a 5"x5" square of card stock then I cut it down to these dimensions:
First you will need to quilt the outside patterned squares of fabric to the batting. I used a purple variegated Aurifil 12 for the quilting. The smoothest, most amazing thread EVER! I love Aurifil, but you can use whatever you want, I guess. :) I quilted the sides with a very simple "x", mostly because I wanted something that wouldn't detract from the pattern of the fabric. I have been hoarding this fabric for a LONG time for just such a project. Draw an "x" on the patterned fabric with a water soluble pen, pin to the batting, and, using a walking foot, quilt each of the four sides and the bottom.
Once all the sides are quilted, the sides will need to be sewn together. Place your layers as follows:
- Inner Fabric
- Outer quilted side face up
- Outer quilted side face down
- Inner fabric
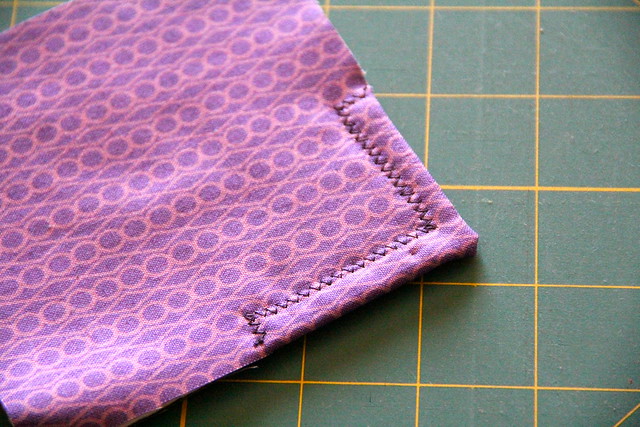
Pin and stitch up one side, starting 1/4" from the end of the fabric and stopping 1/4" from the other end of the fabric. You will want to backstitch or knot each of these seams to make them durable. Open so both sides are face up and add another quilted side piece face down on top of the side on the right. Layer the inner fabric on top, pin and stitch. Repeat. All four sides should be attached in one long line now. Take the ends, right sides together, pin and stitch so you end up with a ring, like this:
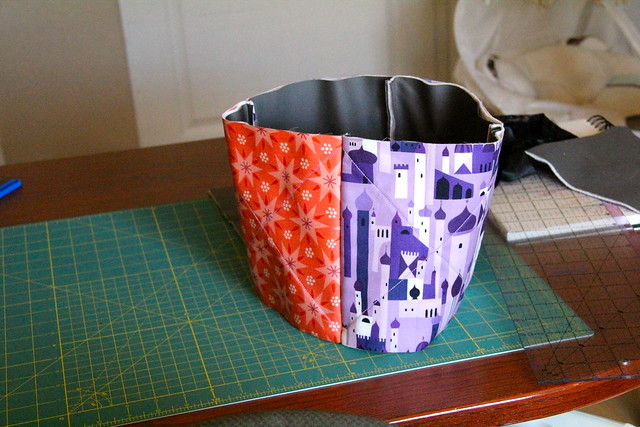
Now set that aside along with the bottom piece. We are moving on to the top.
Using your template, cut your four 5"x5" patterned fabric squares to the correct dimensions.
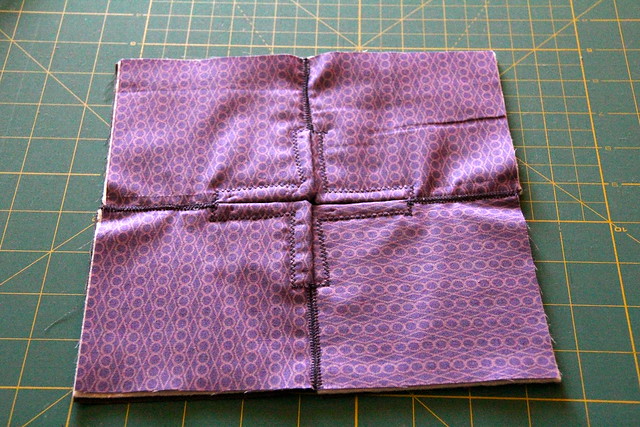
You should end up with your four pieces looking like this:

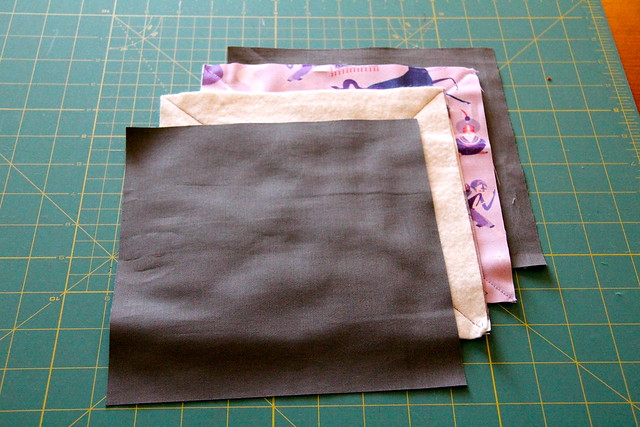
Layer one top patterned piece face down. Place one piece of batting on top, followed by one piece of inner top fabric on top, aligning the bottom left corner.

Press the corner over all layers. Press the sides in to touch the edges of the batting and inner layer. Now, turn that edge over all the other layers, press and pin. Zig zag stitch to hold in place. Repeat for all four top pieces.


Next, change the setting on your machine to the zig zag setting. I made mine tall and narrow, but not so narrow that it became a blanket stitch. Butt two pieces of the top together and zig zag stitch them together from the edge to the finished corners you just created.

Turn the pieces on their side and attach the next quarter. Repeat. Turn the top over so the right side is facing down and stitch over each of the four seams again to strengthen the joints. Your child's hand will be ripping and tearing toys in and out through this opening, after all. You want it to be able to withstand a little rough and tumble.

Next, you will attach the top to the sides. Place the top right side down on the table and the sides you put together before as shown. Note these are wrong side out and the 1/4" you left unsewn on the ends helps it to lay rather flat on the top piece. Pin and stitch in place.

Once the top has been sewn on to all sides, fold at the seam to press, making the edges more crisp.
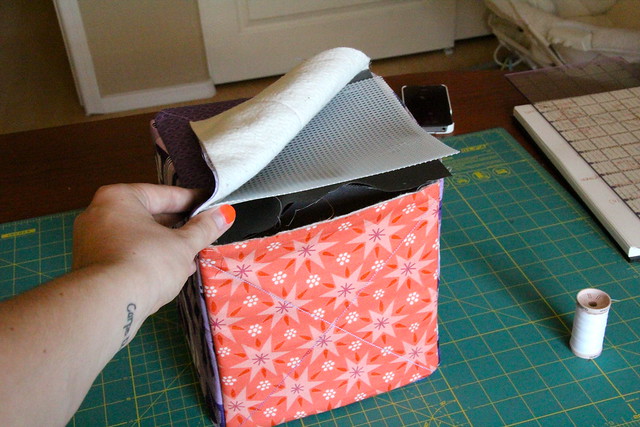
Now it's time to stabilize your box. Take the lacing squares and shimmy them in between the inner fabric and the batting on each of your sides. This will be snug and might catch. It will take a little work to get them in just right. Make sure they are ALL THE WAY DOWN touching the top piece. You will need as much room to hand stitch the bottom on as possible.
Turn the box wrong side out and stitch the bottom piece on just as you did the top, only sewing two adjacent of the four sides.

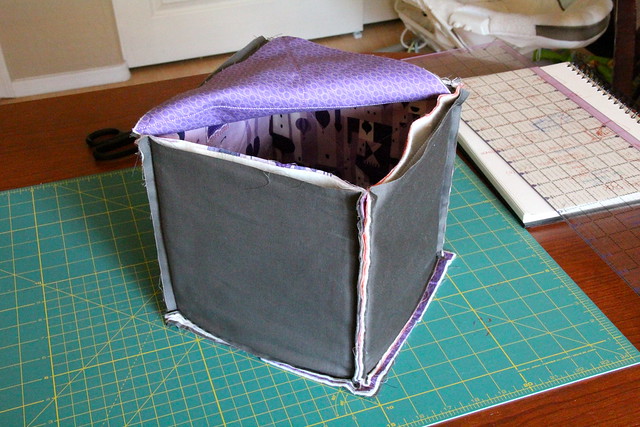
Flip the box right side out.
Place the lacing square in between the batting and inner fabric on the bottom and hand stitched closed.
Now, I am not the best hand stitcher. As a matter of fact, I kind of suck at it, and since there wasn't much room to play with and no real way to sew from the other side, I struggled. I sewed. I seam ripped. I sewed again. I pulled it out. I'm a little finicky too, which doesn't lend well to crappy hand sewing. I settled on rolling the edges inward and basting them down then whip stitching around the opening. It took a couple episodes of Firefly, but I was able to do it in one sitting once I knew how I was going to attack it. You may have a better way of stitching up the bottom and if you do, use it! My way is amateur at best.

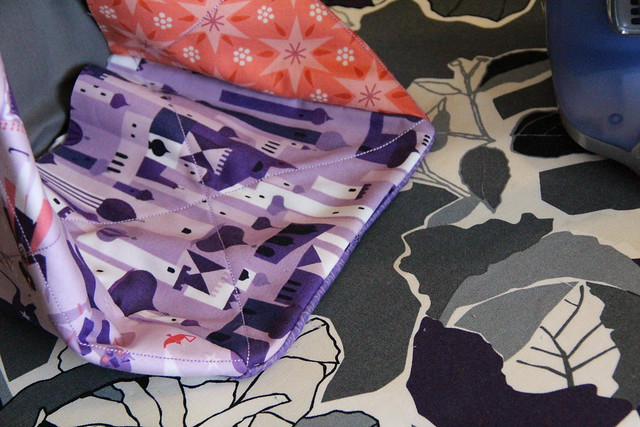
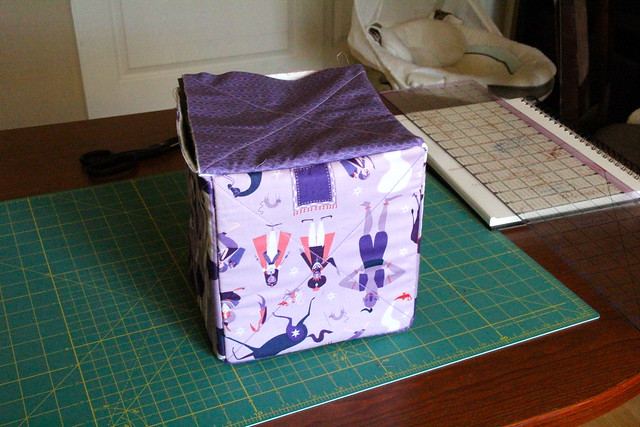
And there you have it! A completed Discovery Box!
I had every intention of making some little plushies to go inside, like a little felt magic lamp and some little felt jewels, but that never happened. Instead Maze has been filling it with other little toys (and my cell phone on more than one occasion) and that has worked just fine for me!
A special shout out to the wonderful Alyssa for letting me come crash her pad while making this project. She's an awesome hostess (and she fed me well too!)
Thanks for checking out my tutorial! As always, if you make one of these boxes, be a dear and post it to the Mommy For Reals Flickr Page. I would LOVE to see your work! Also, make sure you check out the other Plum and June Blog Hop hosts to see what they have going on while you're out blog browsing today!


super cute! Hey, this might be fun to make in a Halloween fabric...
ReplyDeleteHi, Nice to meet you! Very nice tutorial. I could of used something like that several decades ago! LOL
ReplyDeleteDanny - great to meet you - wishing you a great day!
ReplyDeleteWhat a great idea! I need to try making one of these - looks like it would provide some great distraction for the babe while I am blog hopping!
ReplyDeleteI love your fabric choices :)
ReplyDeleteHi Danny, nice to meet oyou. This is such a great idea! I think it might be fun to use it to wrap a present.
ReplyDeleteSuch a great idea!! Love the fabrics :)
ReplyDeleteTotally with you on Firefly - Joss Whedon is awesomeness!
It turned out so good! I was anxious too see. I'm glad she likes it! Looking forward to sewing with you again, expect actually sewing :)
ReplyDeleteThis is cute! I bet my oldest would love this! :) Thanks for sharing!
ReplyDeleteThat is such a fun idea! Loving the fabrics you used too =D
ReplyDeleteThis is such an inventive idea! I'm not sure anyone would have had an easy time sewing that seam. I probably would have slipstitched it too. Your project looks great!
ReplyDeleteThat's a great idea for a little one! I bet your daughter has a lot of fun with it! And now you can put that as the first place to check for the tv remote, car keys, and anything else that little ones love to hide. At least in my house ;)
ReplyDeleteBrilliant, brilliant! I need to make one for my little darlings too!
ReplyDeleteOh Zoe would looove this! Seriously cool tutorial lady. I'm extra impressed you're a Firefly fan :o)
ReplyDeleteWhat a cute little box! Great tutorial!
ReplyDelete~Amy~
So cute! Love this! :)
ReplyDeleteJust loving it - perfect gift for a pregnant friend, thank you! Great to meet you on the Blog Hop :)
ReplyDeleteNice to met you Danny. Great tut on the discovery box. Your little girl will surely love it.
ReplyDeleteYour box is a clever idea! Love it!
ReplyDeleteCunning plan on the discovery box there!
ReplyDeleteCatching up on the blog hop--very cute project! I love the fabrics you chose for it.
ReplyDeleteWhat a good idea. Kids love to 'find' things. . and your hiding box is so cute! Thanks for your part in the blog hop!
ReplyDeleteFabulous! Love it, Danny!
ReplyDeleteOh I could make some of these for my new sewing room!
ReplyDeleteThat is a really great clear tutorial - thank you!:-) Nice to learn more about you!
ReplyDeleteDarling box and great tutorial!
ReplyDeleteStopping by on the blog hop. What a labor of love - the discovery box! I'm sure there are many young mothers out there who will want to make one!
ReplyDeleteI wish I could send you a pick of my 1 year old girl digging into her new discovery box. She loved it, thanks Goethe awesome idea !
ReplyDeleteVery Cute, that would make a great toddler gift!! Great tutorial :)
ReplyDeleteNice to meet you! Fun project & how funny to see something like it in the marketplace!
ReplyDelete